
4 Easy Ways to Take a Screenshot on a Lenovo Laptop
Taking screenshots on laptops has become a common task for most users. If you're new to this, a screenshot is simply a digital image that shows what's currently on your device's screen.
Laptops often have their own unique methods for capturing these images. Today, let's dive into how Lenovo laptop users can easily take screenshots. There are several methods you can use, either using the built-in keyboard keys or additional apps.
Using the PrtSc Button
The simplest and quickest way to take a screenshot on your Lenovo laptop is by using a keyboard shortcut. It’s easy to try and requires just one button press.
Before capturing a screenshot, ensure your Lenovo laptop's keyboard is functioning correctly. If you’re confident that the keyboard is working as expected, follow these steps:
1. Press the PrtSc button
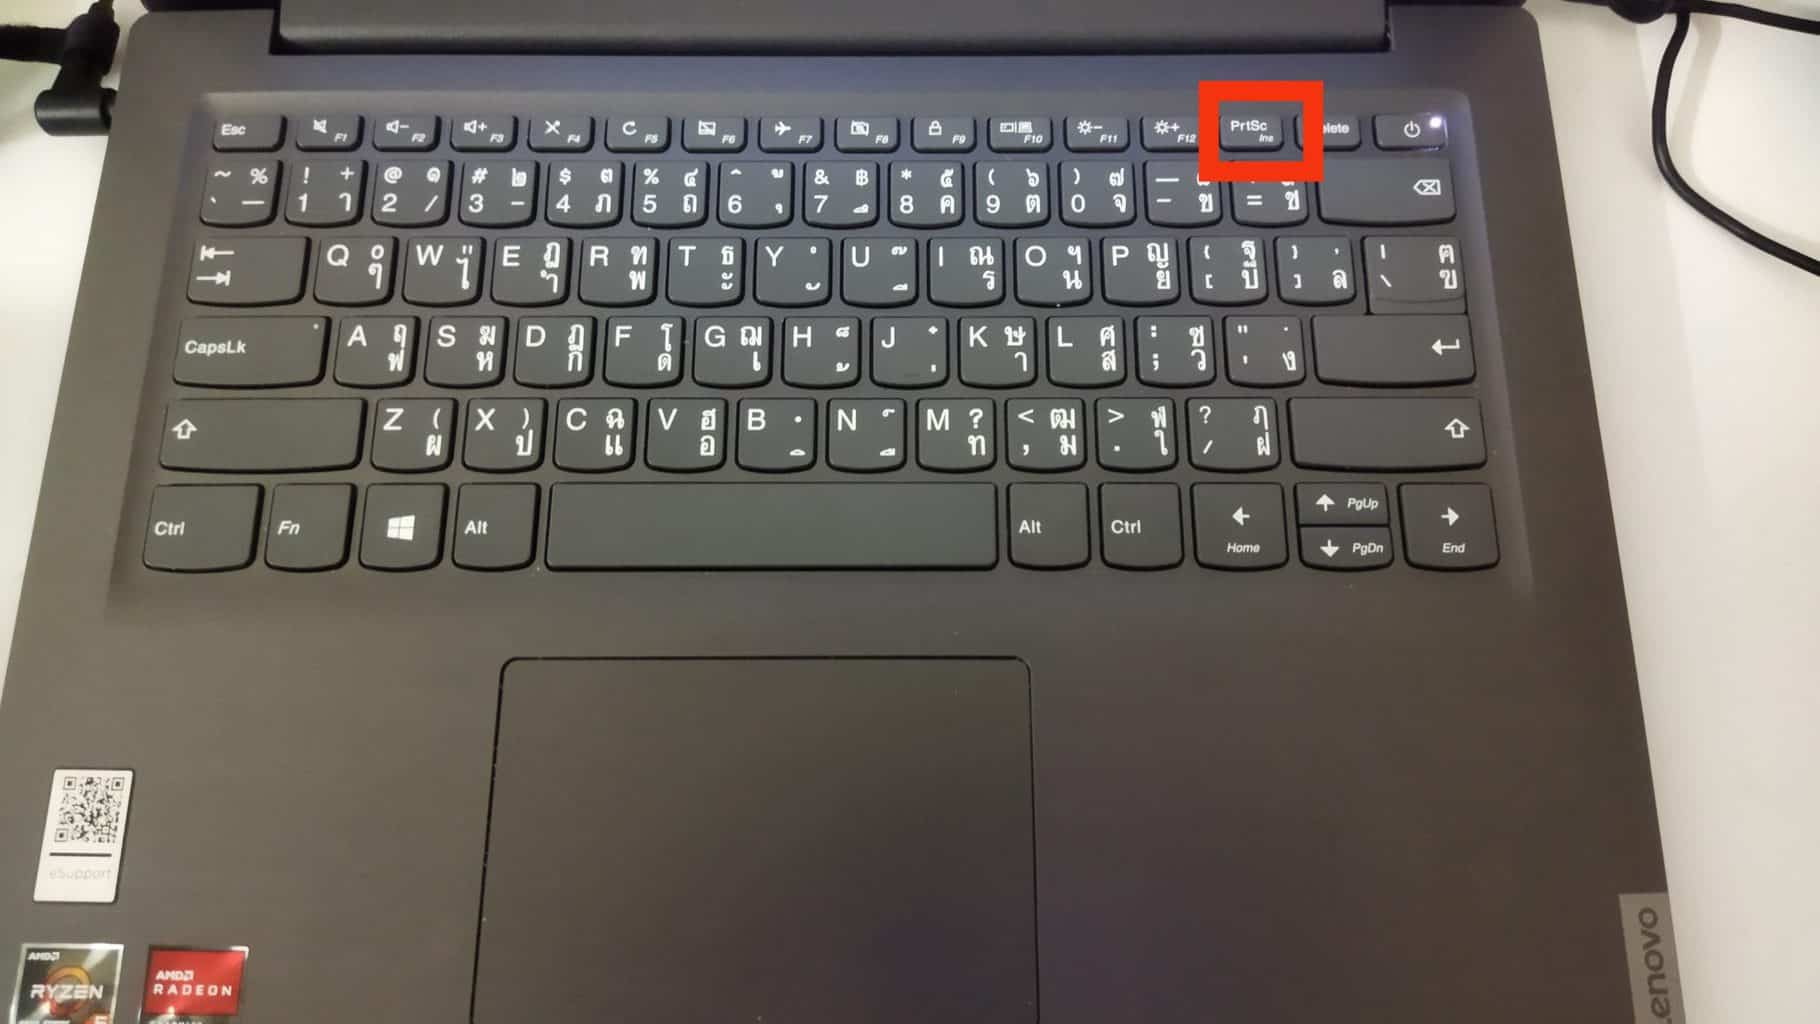
First, open the screen or window you want to capture. Then, press the "PrtSc" (Print Screen) button on your keyboard. This button is typically located at the top-right corner of most Lenovo keyboards.
2. Open the Paint App
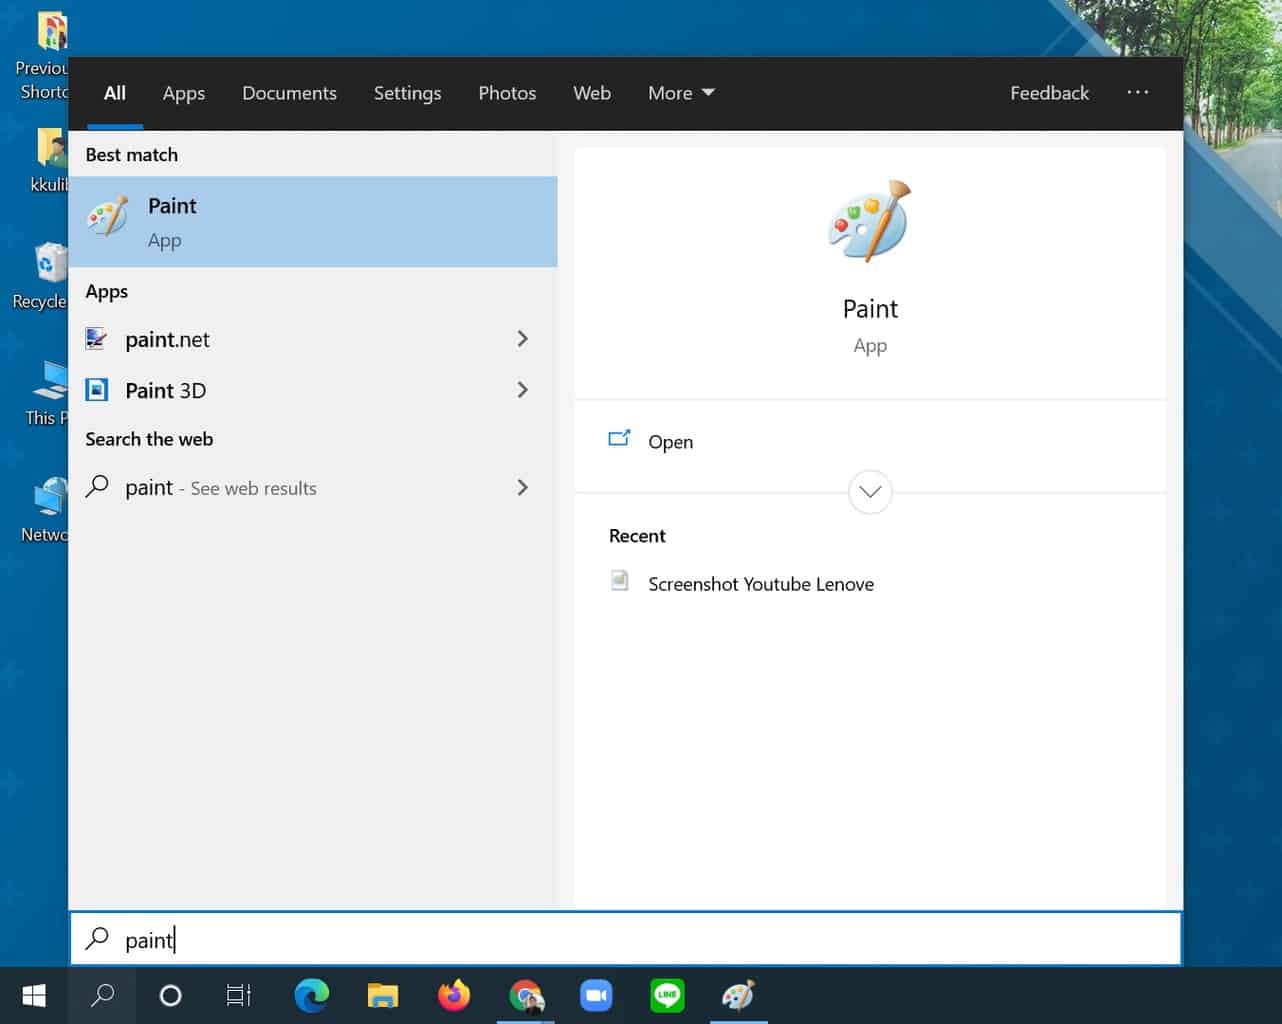

After pressing the "PrtSc" button, the next step is to open an application where you can paste the screenshot, such as Paint, which is usually pre-installed on Windows laptops.
To open Paint, search for it in the search bar and click on the Paint application icon. Once the app is open, press CTRL + V to paste the screenshot onto the blank page.
The screenshot you captured earlier will appear in Paint. From there, you can edit the image if needed, such as adding text, resizing, or making other adjustments.
3. Save the Screenshot
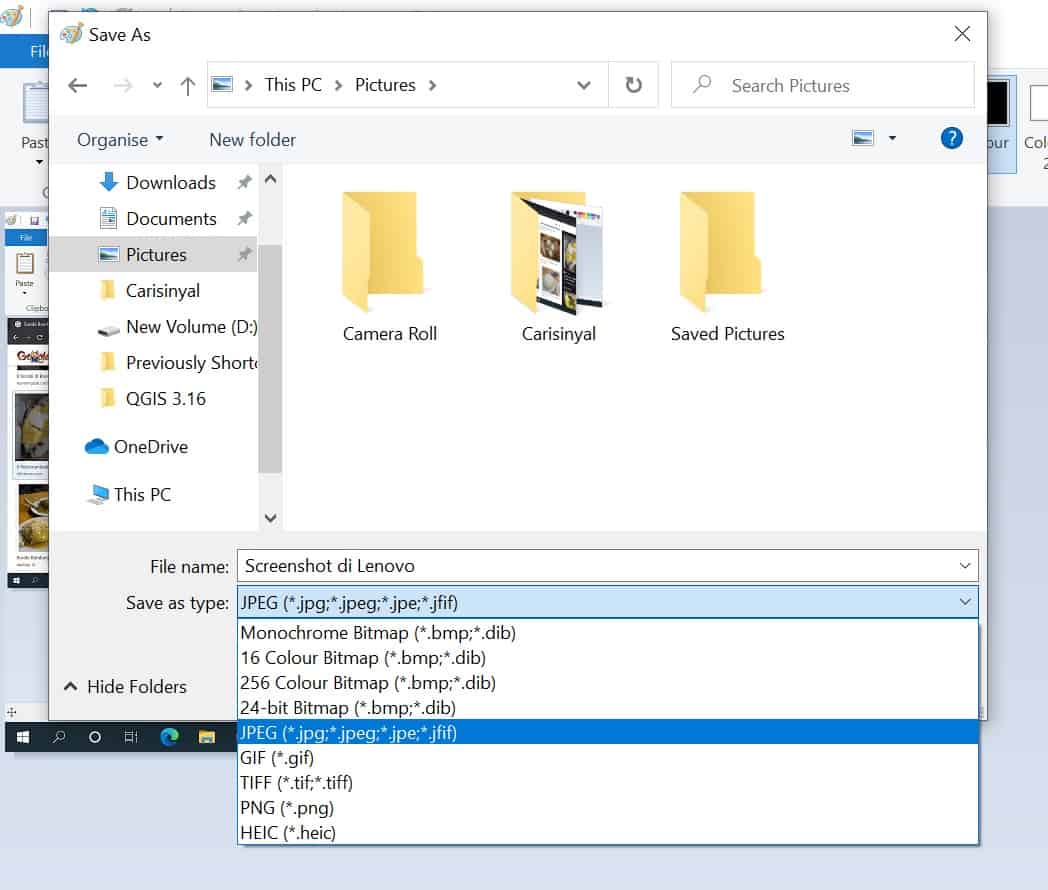
Once done, you can save the screenshot by clicking the diskette-shaped icon at the top of the screen or by pressing CTRL + S.
In the File name field, you can rename the screenshot to your liking. Then, choose the desired file format, such as PDF, JPG, or GIF, from the available options. Don’t forget to select the folder where you want to save the file.
Finally, click the Save button, and voilà! Your screenshot is saved and can be found in the storage folder you selected.
Using the Windows Key + PrtSc
While the first method only uses one key and requires the Paint application, this second method involves pressing two keys at once. Here are the steps:
1. Press the PrtSc Button

First, ensure that your Lenovo keyboard is active and functioning properly, as this is essential for capturing the screen. Then, open the content or window you want to capture.
Once ready, press the Windows + PrtSc keys simultaneously. The Windows key is usually located on the lower-left side of the keyboard and has a window-shaped logo, while the PrtSc (Print Screen) button is typically in the top-right corner.
When you press these keys together, the screen may briefly flash black. This indicates that the screenshot has been successfully captured.
2. Check the Screenshot Result
Unlike the first method, this approach doesn't require using the Paint application or similar software to save your screenshots.
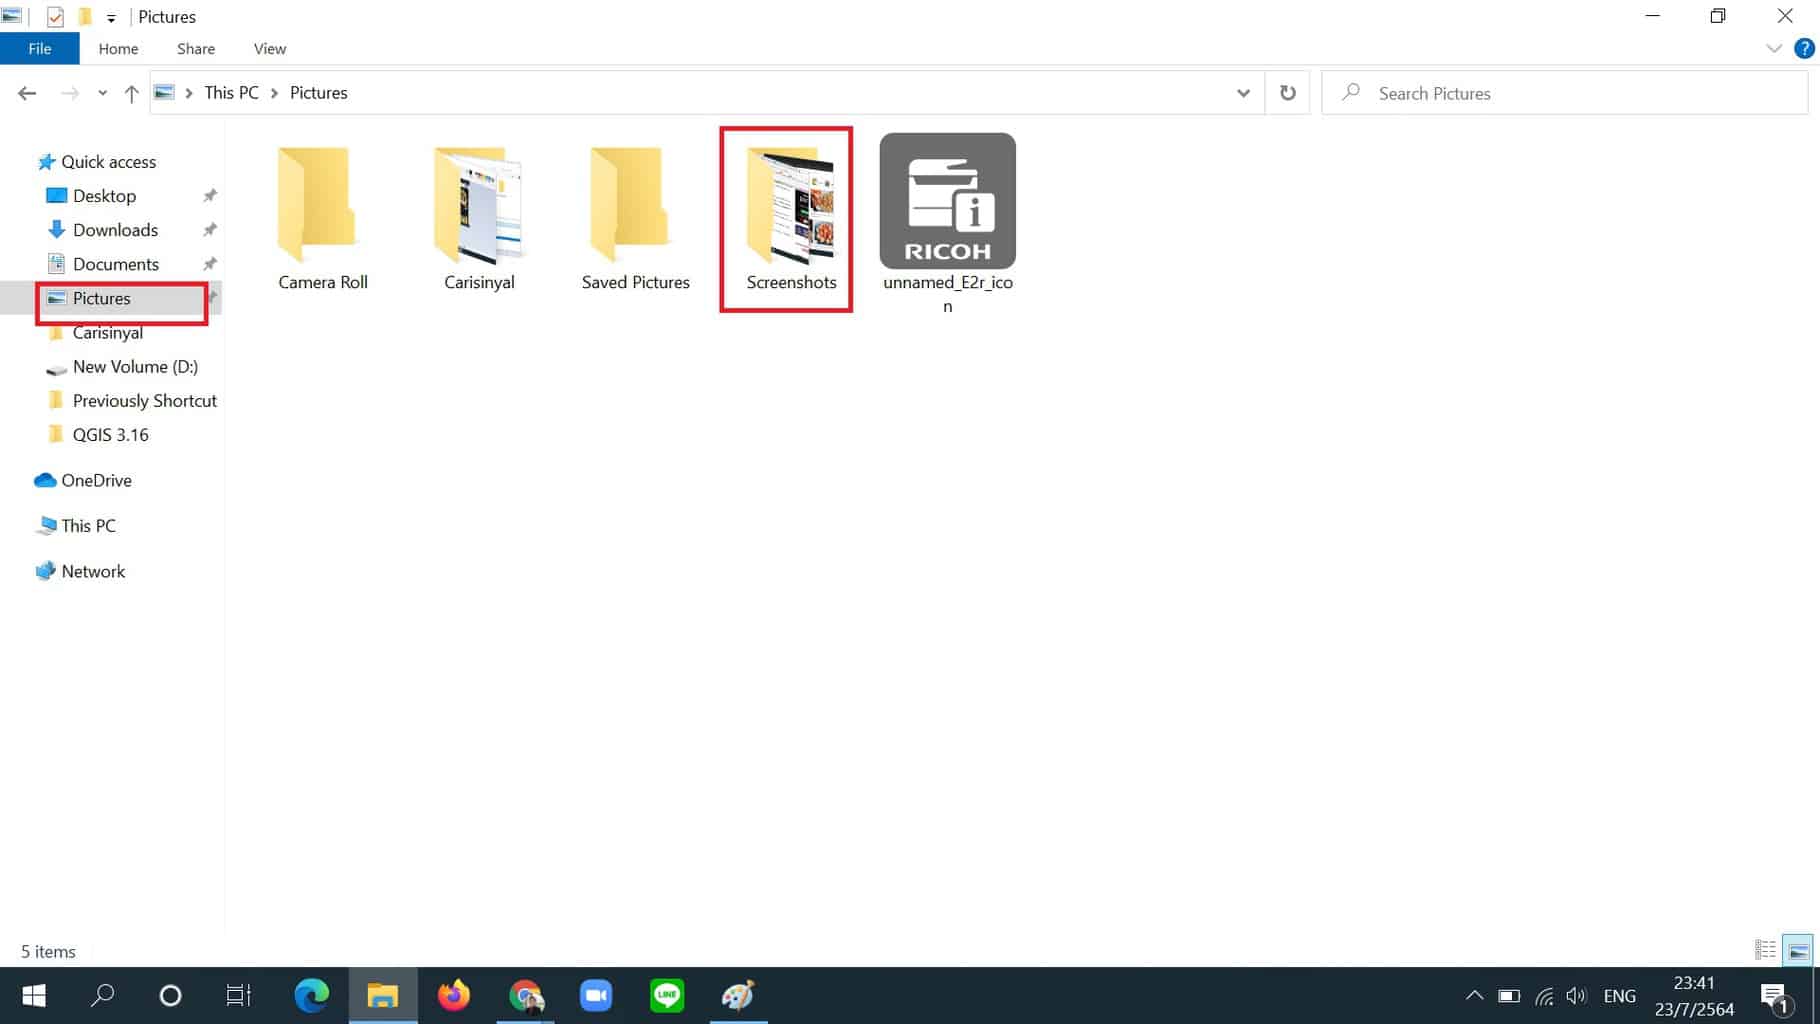
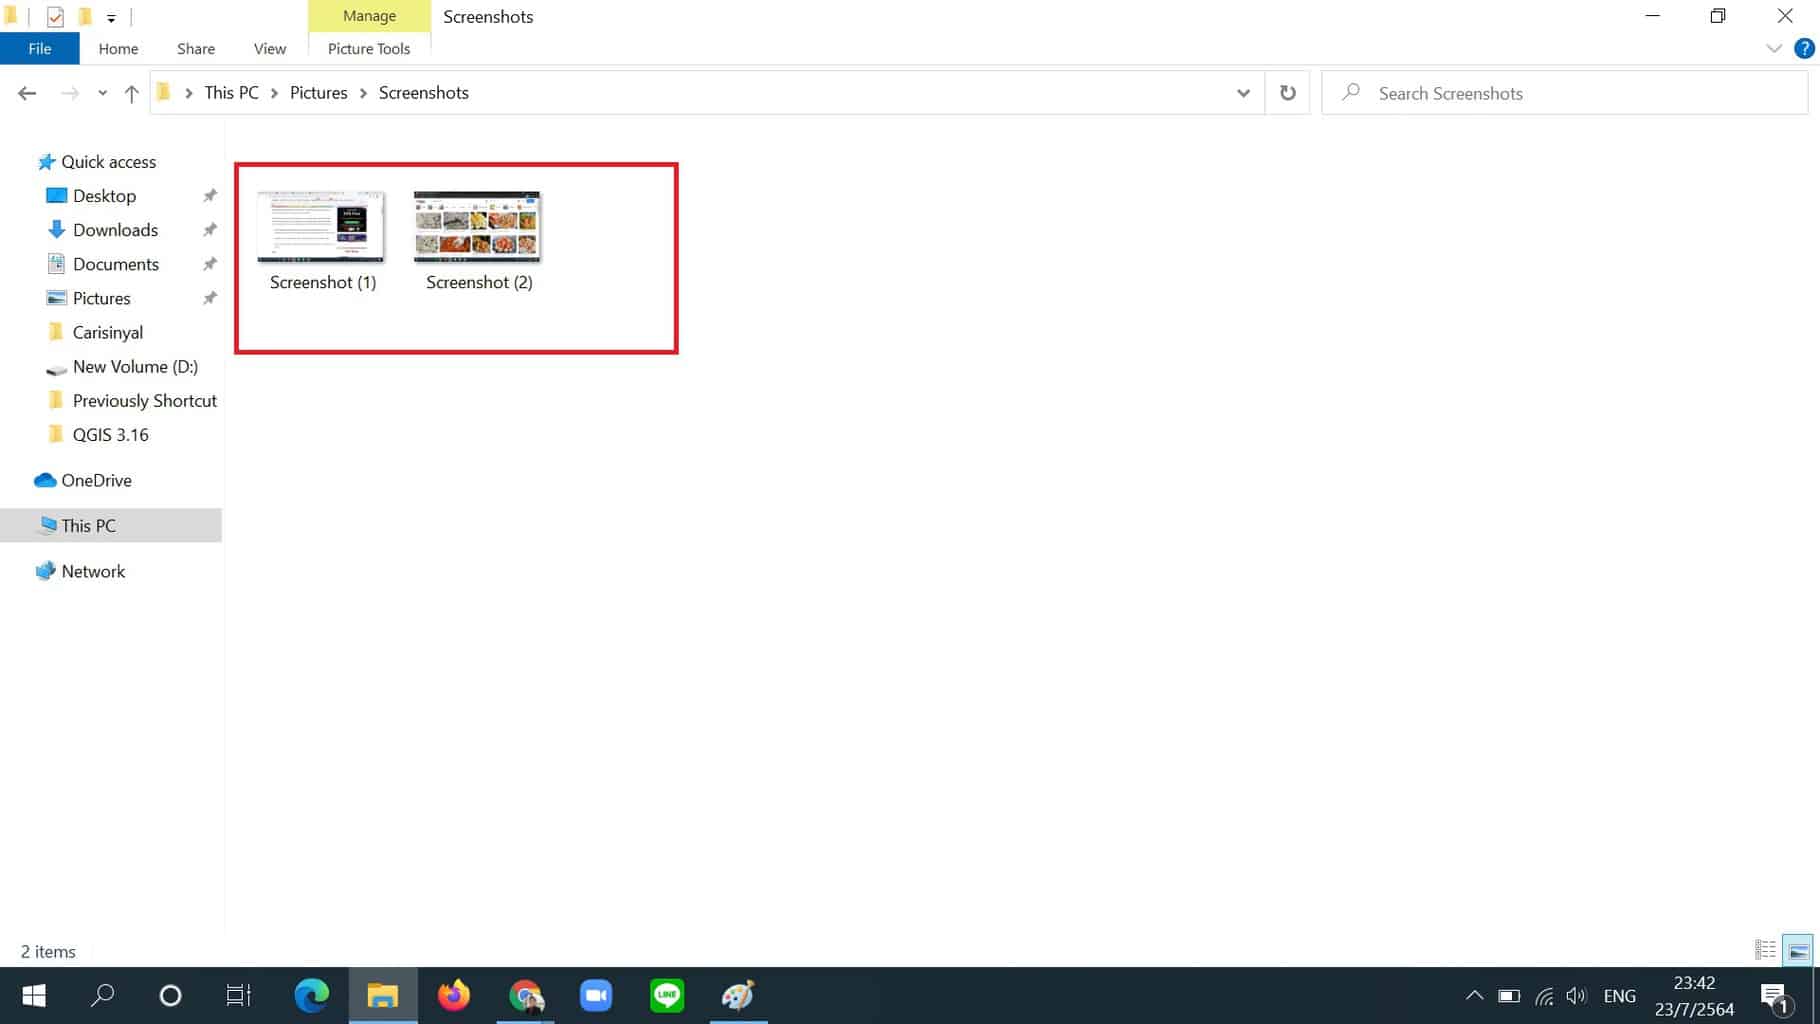
This is because the screenshot is automatically saved in the Pictures folder on your Lenovo laptop. Simply open the Pictures folder and navigate to the Screenshots subfolder.
Here, you’ll find all the screenshots taken using the Windows + PrtSc keys. Convenient and hassle-free, right?
Using the Lightshot App
Another option to take screenshots on a Lenovo laptop is by using a third-party application called Lightshot. Here are the steps:
1. Download and install Lightshot
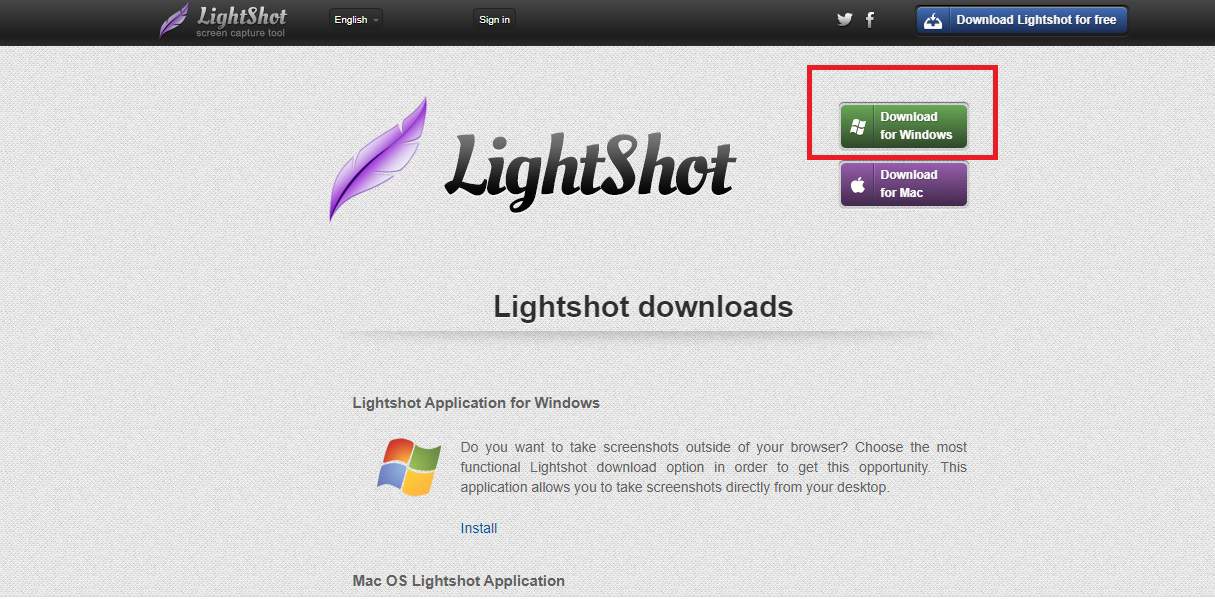
Lightshot is compatible with both Mac and Windows operating systems and is popular worldwide. If your Lenovo laptop doesn’t already have it installed, you can easily download and install Lightshot. To begin, download the application here.
Once installed, you can start by selecting the screen, display, or content you wish to capture.
2. Take Screenshot
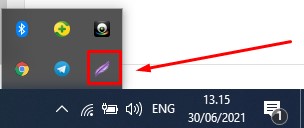
To open Lightshot, simply move the cursor to the bottom right corner of the screen and look for the purple feather icon. Clicking on this icon will cause the screen to turn grayish, indicating that the screen capture process is active.
You can then freely capture the screen as needed, whether it's the entire screen, a specific section, or a particular area.
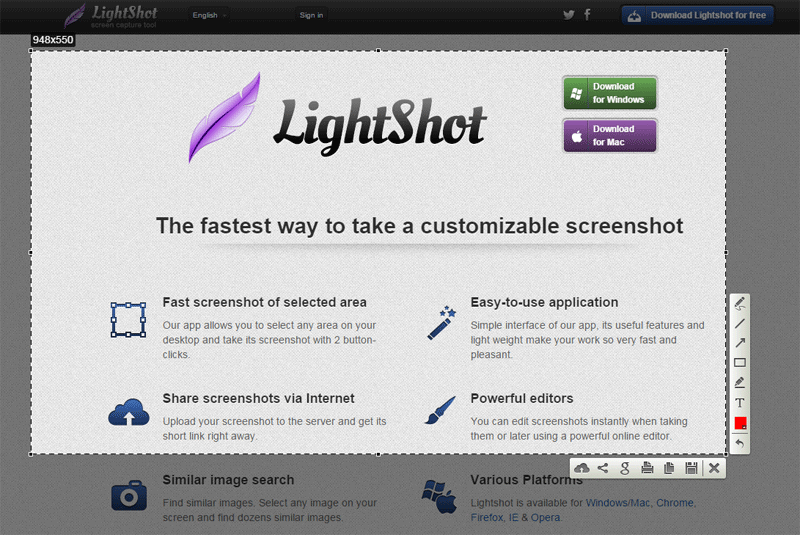
After capturing the screenshot, you can edit it using Lightshot’s features, such as creating boxes, adding text, arrows, and more.
3. Save the Screenshot Result
Once you’ve completed the capture and editing process, you can save the file to a designated folder on your Lenovo laptop. You'll be prompted to choose a file format for the screenshot, such as JPEG, PNG, or BMP.
One of the standout features of Lightshot is its ability to share screenshots online or even print them directly, making it a versatile tool for your needs. Isn't the Lightshot app fantastic?
Using the Snipping Tool App
The final method you can use to capture the screen on your Lenovo laptop is by using the Snipping Tool application. This is a great alternative if the PrtSc (Print Screen) button on your laptop keyboard isn’t functioning properly.
The best part is, you don’t need to download anything because the Snipping Tool is pre-installed on Windows-based laptops. This tool allows you to capture the screen in various ways, whether it's the full screen or just a specific area.
To use the Snipping Tool, start by opening the content or page you want to capture. Next, please follow the steps below:
1. Open Snipping Tool App
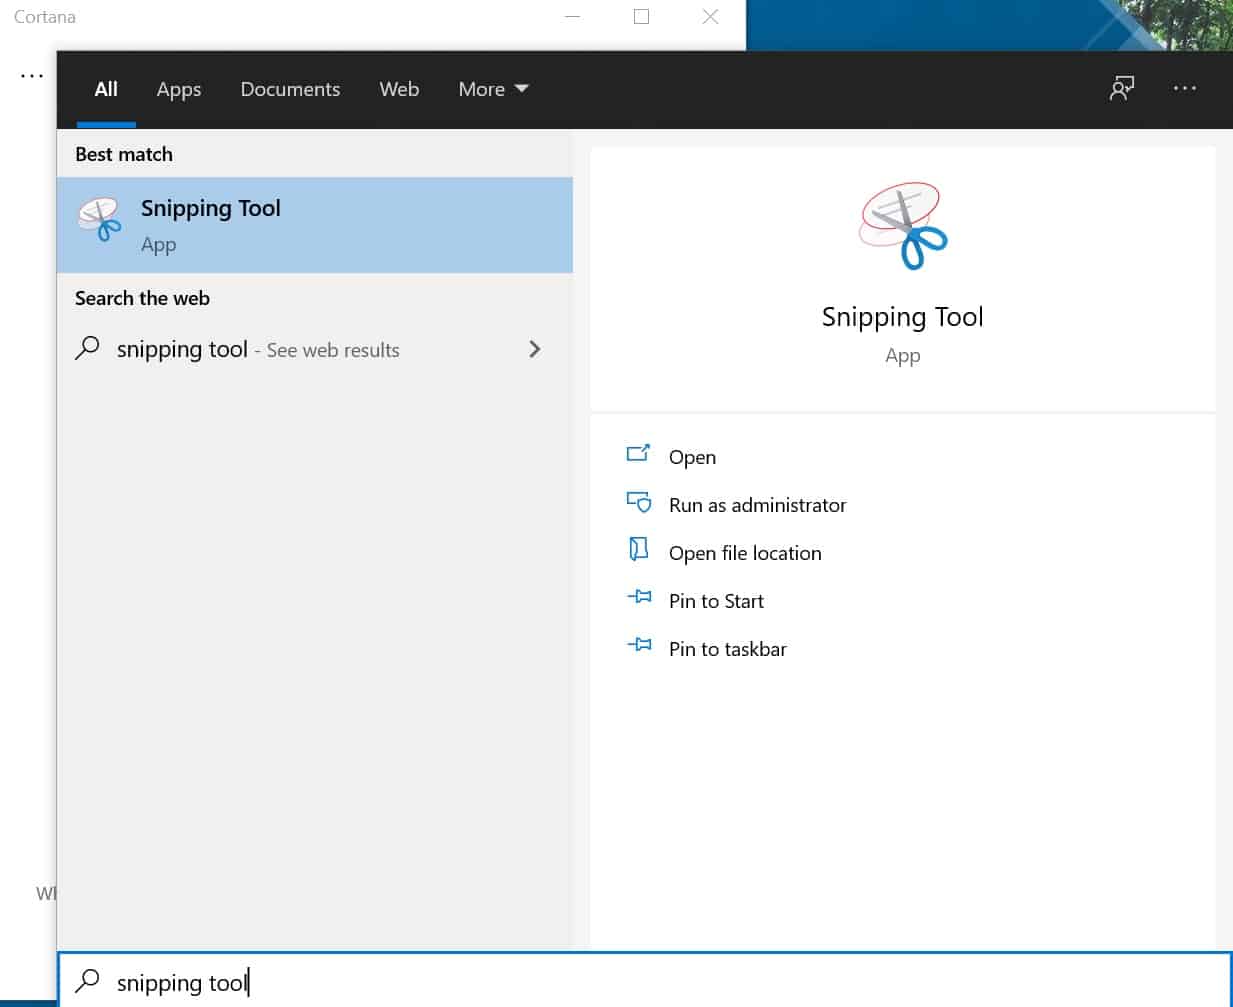
To open the Snipping Tool application, type "Snipping Tool" in the search bar located at the bottom-left corner of the screen. Alternatively, you can find it by browsing through the list of installed applications in Windows.
2. Select the Screenshot Mode
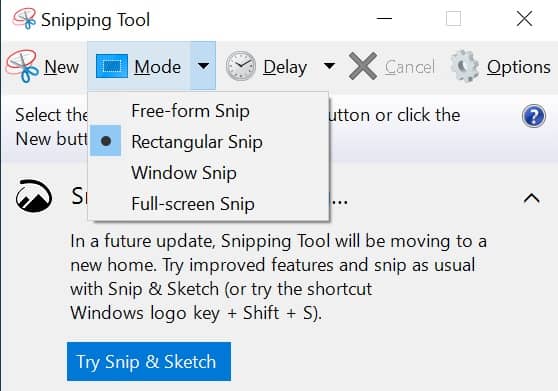
Once the application opens, you’ll see four main options: Mode, Delay, Cancel, and Options.
Click on the Mode option. Here, you’ll find different screenshot styles to choose from, such as Free-form Snip (for capturing in any shape), Rectangular Snip (for capturing in a four-sided shape of your choice), Window Snip (for capturing a specific window), and Full-Screen Snip (for capturing the entire screen).
After selecting the desired screenshot style, move the cursor over the area you want to capture.
3. Save the Screenshot Results
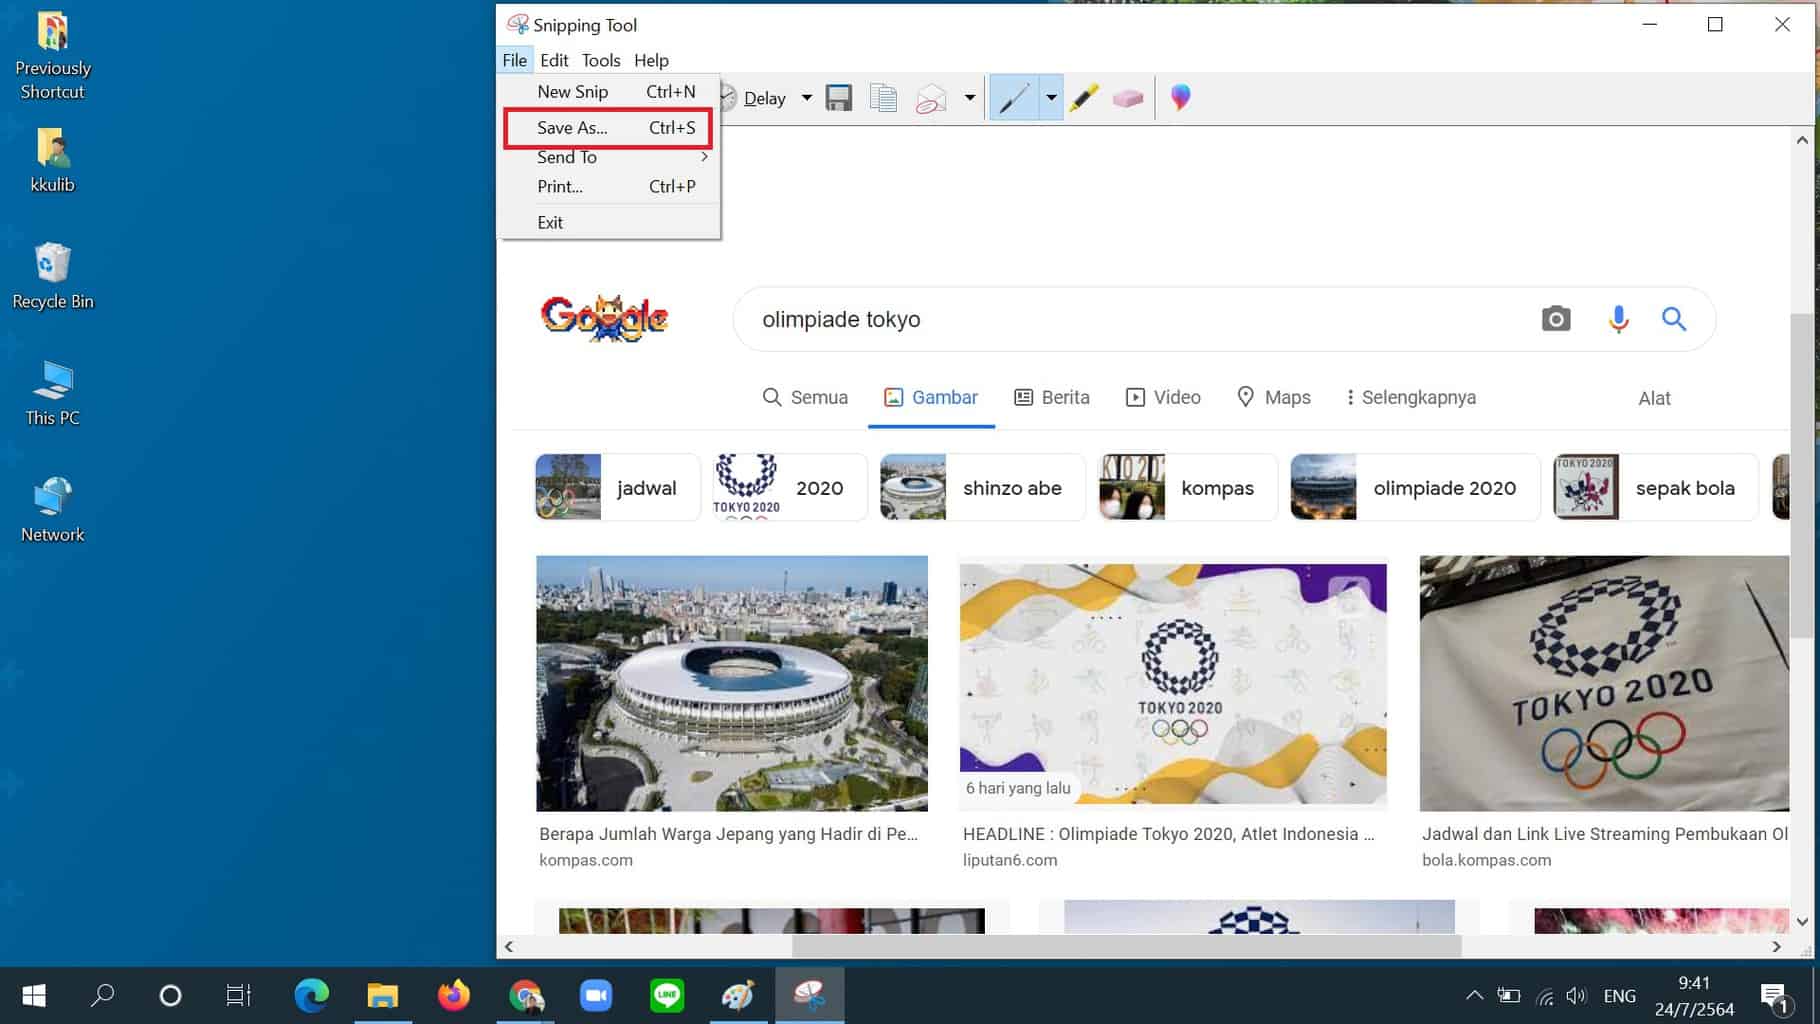
The screenshot will then automatically appear on the Snipping Tool’s page. To save it, simply click on the File menu and select Save As to store the screenshot in a folder on your Lenovo laptop.
These are some methods you can use to take screenshots on a Lenovo laptop. By following the steps above, you can take screenshots quickly and efficiently. Best of luck!